Full-body silicone baby dolls routinely sell for $2,000 to $6,000 through reborn artist marketplaces. Building one yourself brings the cost down to $200 to $500 in raw materials, depending on size and detail level.
Learning how to make a silicone baby combines sculpture, mold making, silicone casting, and fine art painting into a single project. Reborn artists typically spend 50 to 100 hours across all stages, from the first clay press to the final powder dusting.
This guide covers every stage, from material picks to the pro techniques behind lifelike results.
What You Need to Make a Silicone Baby
In short, you need sulfur-free sculpting clay, platinum-cure silicone rubber for casting, skin-tone pigments, and finishing materials like mohair and glass eyes.
You’ll need materials from four categories: sculpting, mold making, casting, and finishing. Buying individually usually costs less than a pre-assembled doll kit.
Sculpting supplies include sulfur-free modeling clay like Chavant NSP or Monster Clay, armature wire for structural support, and basic sculpting tools. Sulfur-free clay is mandatory because sulfur inhibits platinum-cure silicone from curing properly.
Mold making supplies include a mold box (foam board or melamine work well), mold release spray, and a brush-on or pourable mold silicone like Smooth-On Rebound 25 or Dragon Skin 10. You also need a rigid shell material like Plasti-Paste or fiberglass bandages to support the flexible mold.
Casting materials are where quality matters most. Platinum-cure silicones like Ecoflex 00-20, Ecoflex 00-30, or Dragon Skin FX Pro produce soft, stretchy skin that feels surprisingly close to a real newborn.
You’ll also need Silc Pig silicone pigments for base skin tones and Psycho Paint or silicone paint base for detail work.
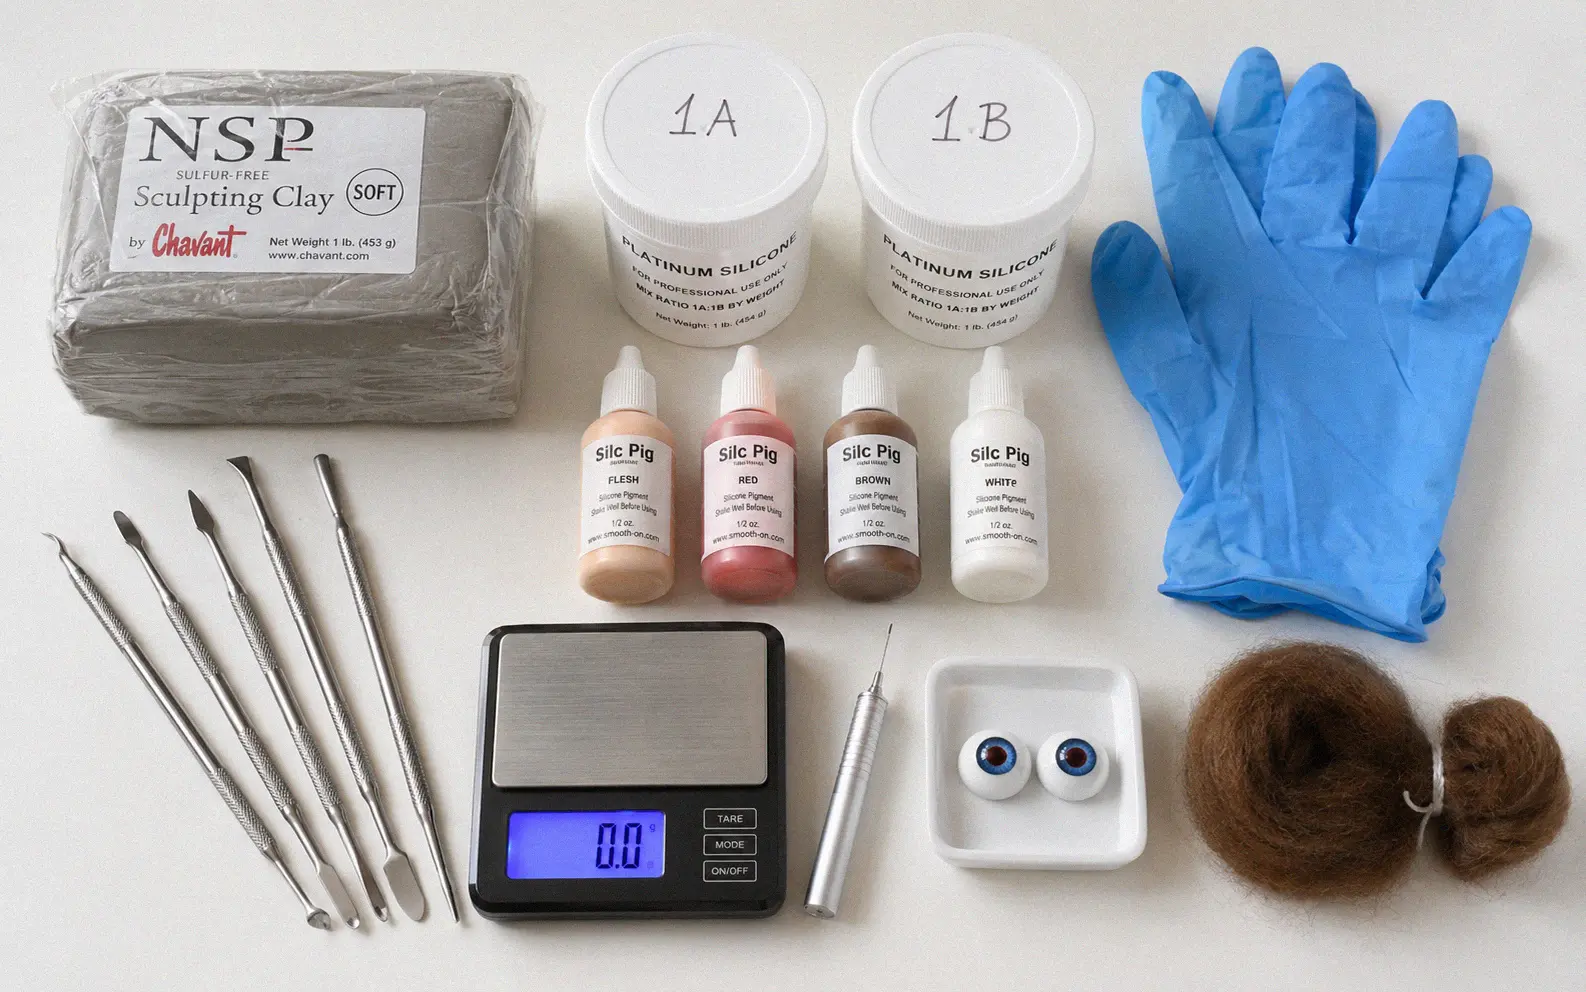
Finishing supplies include mohair or human hair, a rooting needle holder with 42-gauge needles, glass or acrylic doll eyes, eyelash strips, glass micro beads for weighting, polyfill, a cloth body, and cornstarch or matte powder for surface finishing.
Organize everything before you start. Stopping mid-pour to hunt for a missing supply can ruin a batch of mixed silicone.
Picking the Right Silicone for Baby Dolls
Your silicone choice directly shapes how realistic the finished doll feels. Platinum-cure formulas in the Shore 00-20 to 00-30 range work best for lifelike softness.
Not all silicones feel the same, and the durometer (hardness) you choose determines how realistic the doll feels in your hands. Pourable silicone products range from ultra-soft to firm, so matching the right shore hardness to your project matters.
Ecoflex 00-20 is the go-to for most reborn artists. It has a Shore 00-20 hardness that closely mimics the squish of a real newborn’s skin, and its low viscosity pours smoothly into detailed molds.
If you want something a bit firmer, Ecoflex 00-30 gives you better tear resistance. Artists working on larger dolls or pieces that need to hold their shape during handling tend to prefer it.
Dragon Skin FX Pro splits the difference with excellent detail capture and a longer pot life. That extra working time is a real advantage for beginners who need more room to mix, tint, and pour without rushing.
Stay away from tin-cure (condensation-cure) silicones for baby dolls. They shrink over time, yellow with UV exposure, and won’t accept platinum-based paint systems like Psycho Paint.
Always run a small test batch before committing to a full pour. Mix two ounces, add your pigment, and let it cure overnight to confirm the color and texture match your target.
Step 1 – Sculpt the Original in Modeling Clay
Every silicone baby begins life as a clay sculpture. The original determines every detail that transfers through the mold to the final casting, so this is where artistic patience really pays off.
Start by twisting aluminum wire into a basic skeleton shape for the armature. This framework keeps the clay from sagging or collapsing as you build up layers, especially around the head and limbs.
Press sulfur-free clay like Chavant NSP Medium onto the armature in thin layers. Build the general proportions first, then refine features progressively.
Reference photos of real newborns make a huge difference here. They help you nail the subtle proportions that separate a lifelike sculpt from a cartoon-looking one.
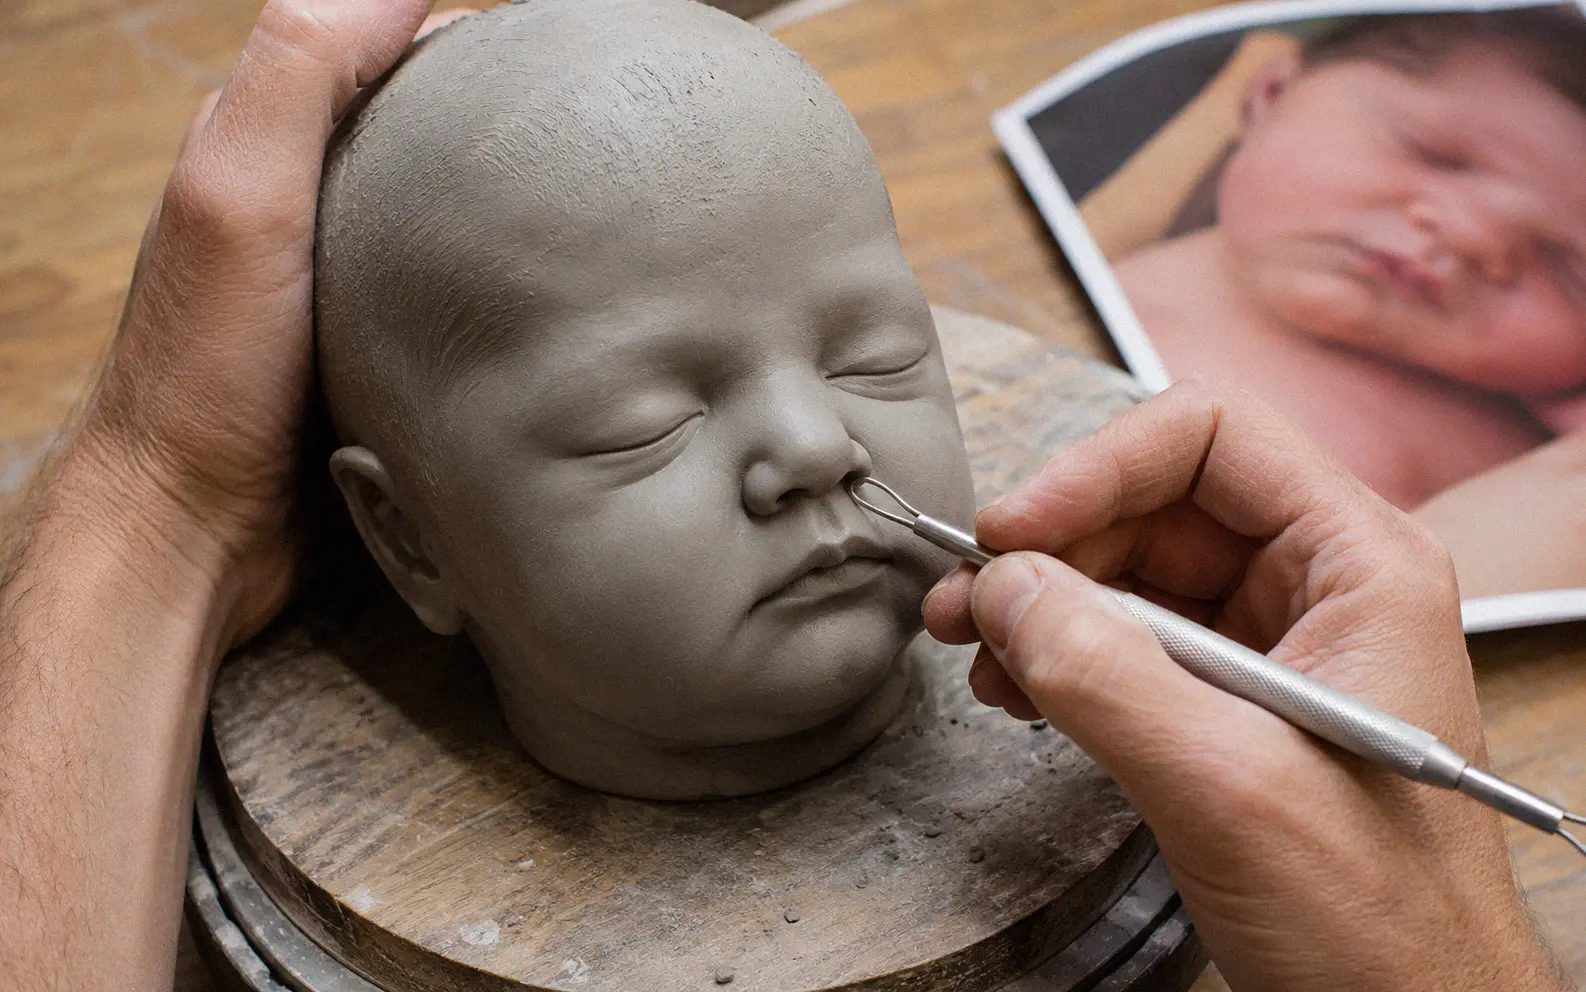
Focus on the face last. Newborn features are surprisingly flat and compressed compared to older babies, with wide-set eyes, a tiny nose bridge, and full cheeks.
Use ball-tipped tools and silicone-tipped shapers for smoothing fingerprints and tool marks from the surface.
For skin texture, press commercial texture stamps or real skin patterns into the clay. Forehead wrinkles, knuckle creases, and that fine pore pattern across the cheeks all carry through to the finished doll.
Check symmetry frequently from directly above, below, and straight on. Asymmetry in the eye sockets or cheekbones gets amplified once the piece is cast in translucent silicone.
Step 2 – Build a Mold Box and Apply Release Agent
A two-part block mold is the standard approach for full silicone baby heads and limbs. Getting comfortable with how to use silicone molds from the start saves material and prevents warped castings down the line.
Build the mold box from foam core board, melamine-coated MDF, or acrylic sheets. Cut the panels to leave roughly one inch of space between the sculpture and each wall.
Seal every seam with hot glue or clay to prevent liquid silicone from leaking during the pour.
Embed the clay sculpture halfway into a bed of sulfur-free clay at the bottom of the box. This creates the parting line where the two mold halves will separate.
Press registration keys (small round indentations) into the clay bed so the halves lock together precisely during casting.
Apply a thin coat of mold release agent to every exposed surface. Ease Release 200 from Smooth-On is the industry standard for platinum silicone work, and it needs 10 minutes to dry before pouring.
Skip this step and the mold halves fuse together permanently. You’ll lose both the mold and the original sculpture inside it.
Step 3 – Pour the Silicone Mold
Mix your mold-making silicone at the exact ratio printed on the packaging. Dragon Skin 10 and Rebound 25 both use a 1:1 mix ratio by volume, but other products may differ.
Get the ratio wrong and you’ll end up with a sticky, partially cured mess that ruins the whole project.
Pour a thin stream from about 12 inches above the mold box. The height stretches the silicone thin and breaks surface bubbles before they settle.
Fill until the silicone covers the highest point of the sculpture by at least half an inch.
Vibrate the mold box gently for three to five minutes to drive trapped air to the surface. A palm sander placed against the table works if you don’t own a vibrating table.
Any air bubbles left behind show up as pits and divots on the casting surface, and patching them later is tedious.

Let the first half cure completely according to the product’s technical bulletin. Dragon Skin 10 cures in about five hours at room temperature, while Rebound 25 needs roughly 24 hours for a full cure.
After the first half cures, flip the mold box, remove the clay bed, apply fresh release agent, and repeat for the second half. Once both halves have cured, open the mold carefully and remove the clay original.
Clean the interior with isopropyl alcohol before casting.
Step 4 – Mix and Tint the Casting Silicone
This step locks in the base skin color for your entire doll, and everything you paint in later steps builds on top of it.
This is the silicone that actually becomes your baby doll, so color matching matters here more than anywhere else. Silc Pig pigments from Smooth-On are what most artists use for tinting platinum-cure silicones without messing up the cure.
Start with a flesh-tone base by mixing small amounts of Silc Pig Flesh, a touch of Red, and a trace of Brown into Part A of your silicone before combining it with Part B. Add pigment gradually since a little goes a long way, and you can always darken but never lighten a mixed batch.
Target a slightly lighter shade than your final goal. The painted detail layers added in Step 7 deepen the overall skin tone significantly.
Go too dark at this stage and the finished doll ends up looking flat and unrealistic.
Mix Part A and Part B together thoroughly for at least three minutes, scraping the sides and bottom of the container. Incomplete mixing causes uncured pockets inside the casting that feel sticky and never fully harden.
If you have access to a vacuum chamber, degas the mixed silicone for two to three minutes until the bubbles stop rising. Degassing eliminates micro-bubbles that cloud the translucent skin effect you need for realism.
Step 5 – Cast the Silicone Into the Mold
Put both mold halves together, secure them with rubber bands or C-clamps, and double-check that the registration keys are fully seated. Even a small gap between the halves creates a thick flash line that’s a pain to trim cleanly.
Pour the tinted silicone slowly into the mold opening. A steady, thin stream reduces turbulence and traps fewer air pockets inside the casting.
For closed molds, leave a pour spout and at least one vent hole at the highest point so displaced air can escape.
Rotate the mold gently after pouring to coat all interior surfaces evenly. Many artists use a roto-casting technique, turning the mold continuously to build a hollow shell of uniform thickness.
Solid pours are fine for small pieces like hands and feet, but they add way too much weight to heads and torsos.
Cure times depend on silicone brand and ambient temperature. Ecoflex 00-20 reaches handling strength in about four hours at 72°F, but temperatures above 100°F can cause yellowing.
Let the mold sit undisturbed on a level surface during the entire cure window.
Step 6 – Demold and Trim the Casting
Peel the mold halves apart slowly, working the silicone away from the casting. Platinum-cure silicone releases well on its own, so the casting should pull free without tearing, assuming you applied release agent correctly back in Step 3.
Inspect the casting for air pockets, thin spots, or incomplete fills. Small surface bubbles can be patched with a thin layer of fresh silicone applied with a brush.
Larger voids usually mean you need to recast that piece from scratch.
Trim the flash line (the thin ridge along the parting seam) with sharp curved scissors or a hobby knife. Work carefully around delicate areas like fingers, ears, and nostrils where the silicone is thinnest.
Making a silicone mask uses the same trimming techniques, so the skills transfer directly between projects.
Sand any leftover seam marks with fine-grit wet sandpaper (600 grit or higher) dampened with soapy water. You want a completely seamless surface that accepts paint evenly.
Any visible ridge will show through the finished skin layers.
Step 7 – Paint Lifelike Skin Layers
Put simply, realistic doll painting uses multiple thin, translucent coats, not a single layer of skin-colored paint.
This is the stage that takes a blank silicone casting and makes it look genuinely human. Platinum-cure silicone is naturally translucent, which lets you layer paint techniques that mimic the depth of real skin.
Use a silicone-compatible paint system exclusively. Psycho Paint from Smooth-On, Silicone Fusion paints from FuseFX, and Genesis Heat Set Paints are the three most popular options in the reborn community.
Don’t bother with regular acrylics or oil paints. They’ll peel off cured silicone within days.
Start with a mottled base layer. Stipple a warm pink shade lightly across the entire surface with a sea sponge or stiff bristle brush.
Mottling breaks up the solid base color and creates the uneven tonal variation visible in real newborn skin.
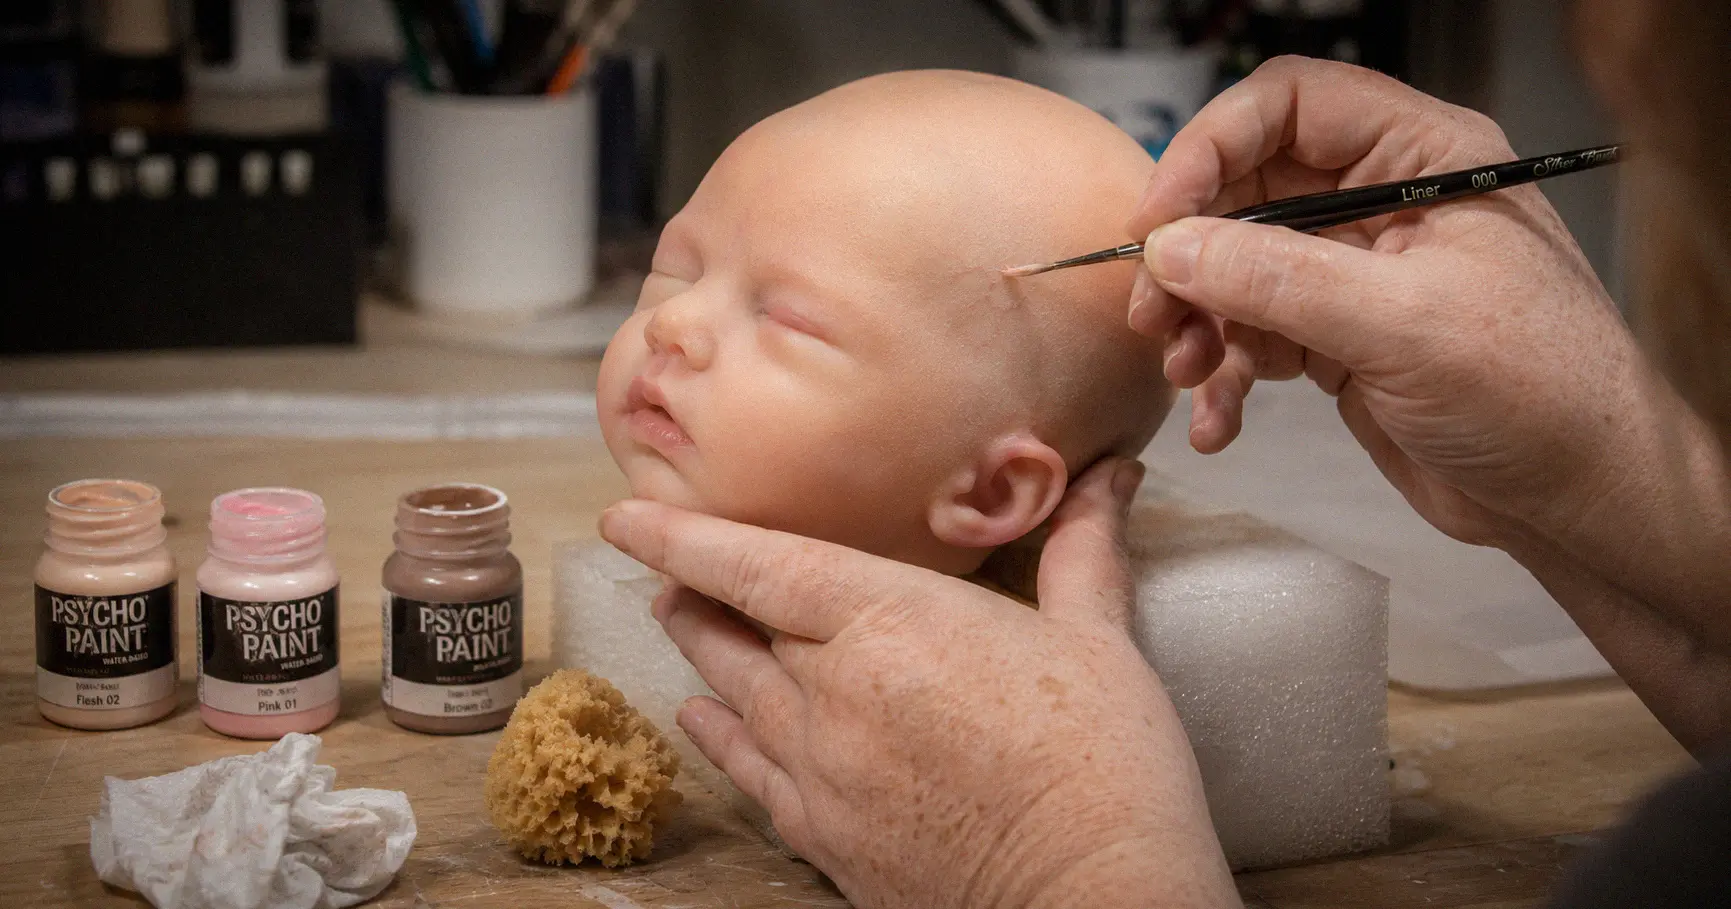
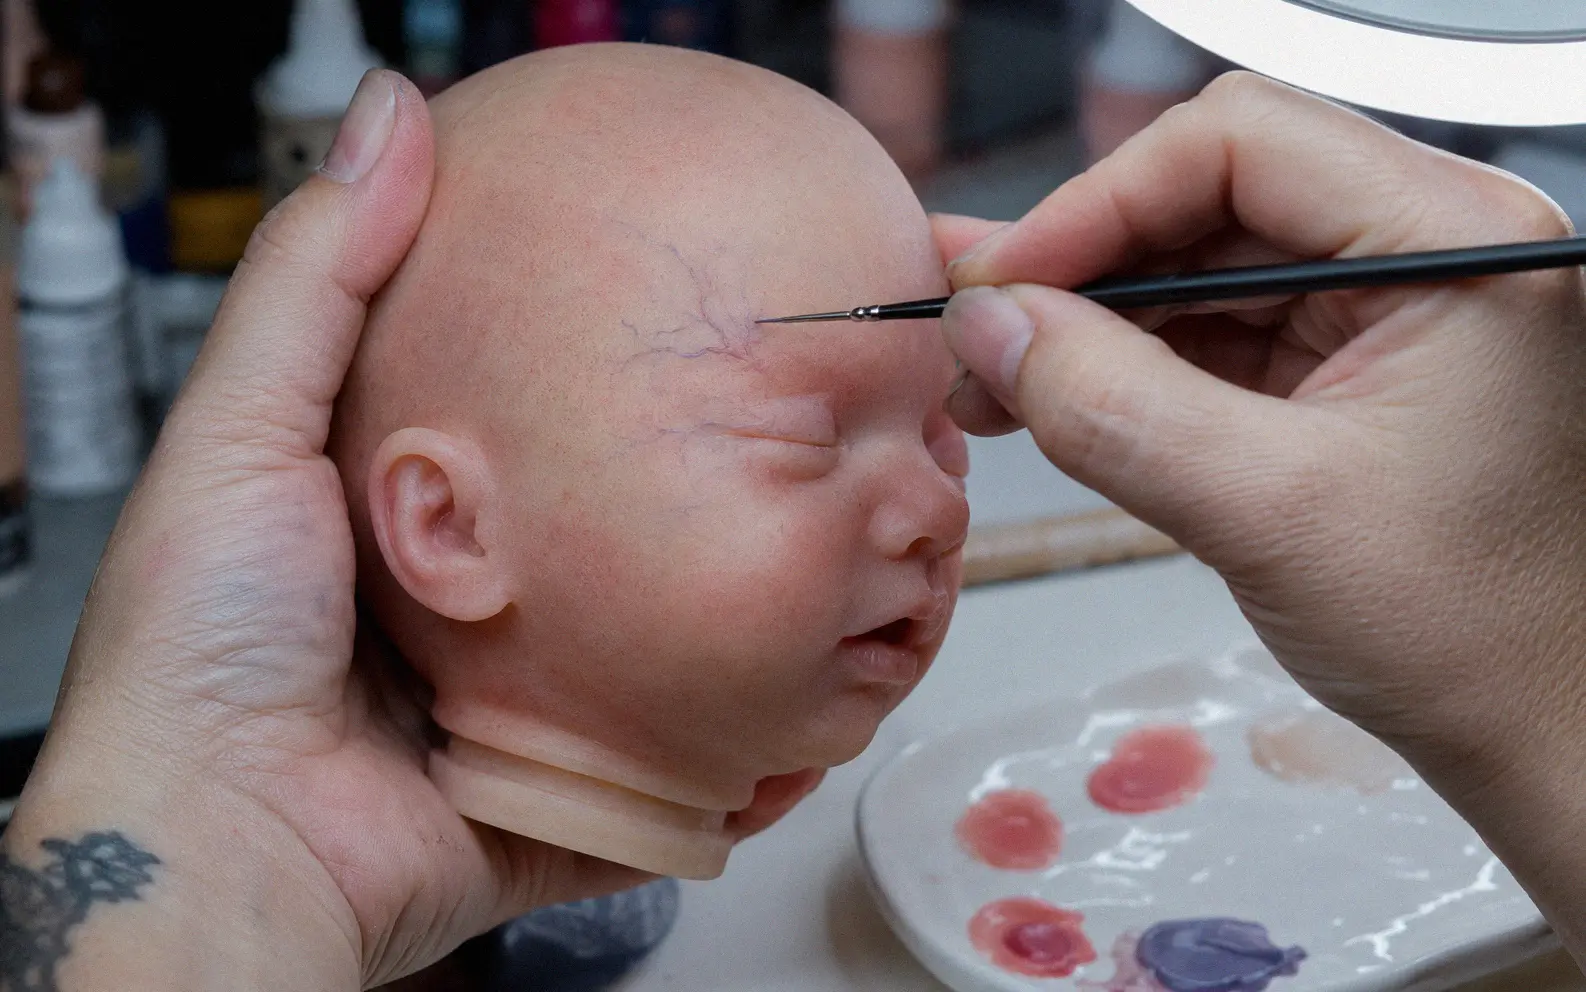
Add a blue-purple veining layer next. Use a fine liner brush to paint thin, branching vein patterns on the temples, eyelids, wrists, and tops of the feet.
Putting this layer down early is key. Subsequent paint coats partially obscure the veins, which is exactly how real skin looks.
Apply blushing to the cheeks, nose tip, chin, knees, elbows, knuckles, and heels. Build warm pink tones in thin passes, and let each layer dry or heat-set between coats.
Detail the creases and folds last. Darken the skin inside wrinkles, behind ears, and between fingers to create shadows, then highlight cheeks, nose bridge, and brow with a lighter mix.
Heat-set paint users need a convection oven at 265°F for each curing pass. Air-cure silicone paints dry on their own but take longer between layers.
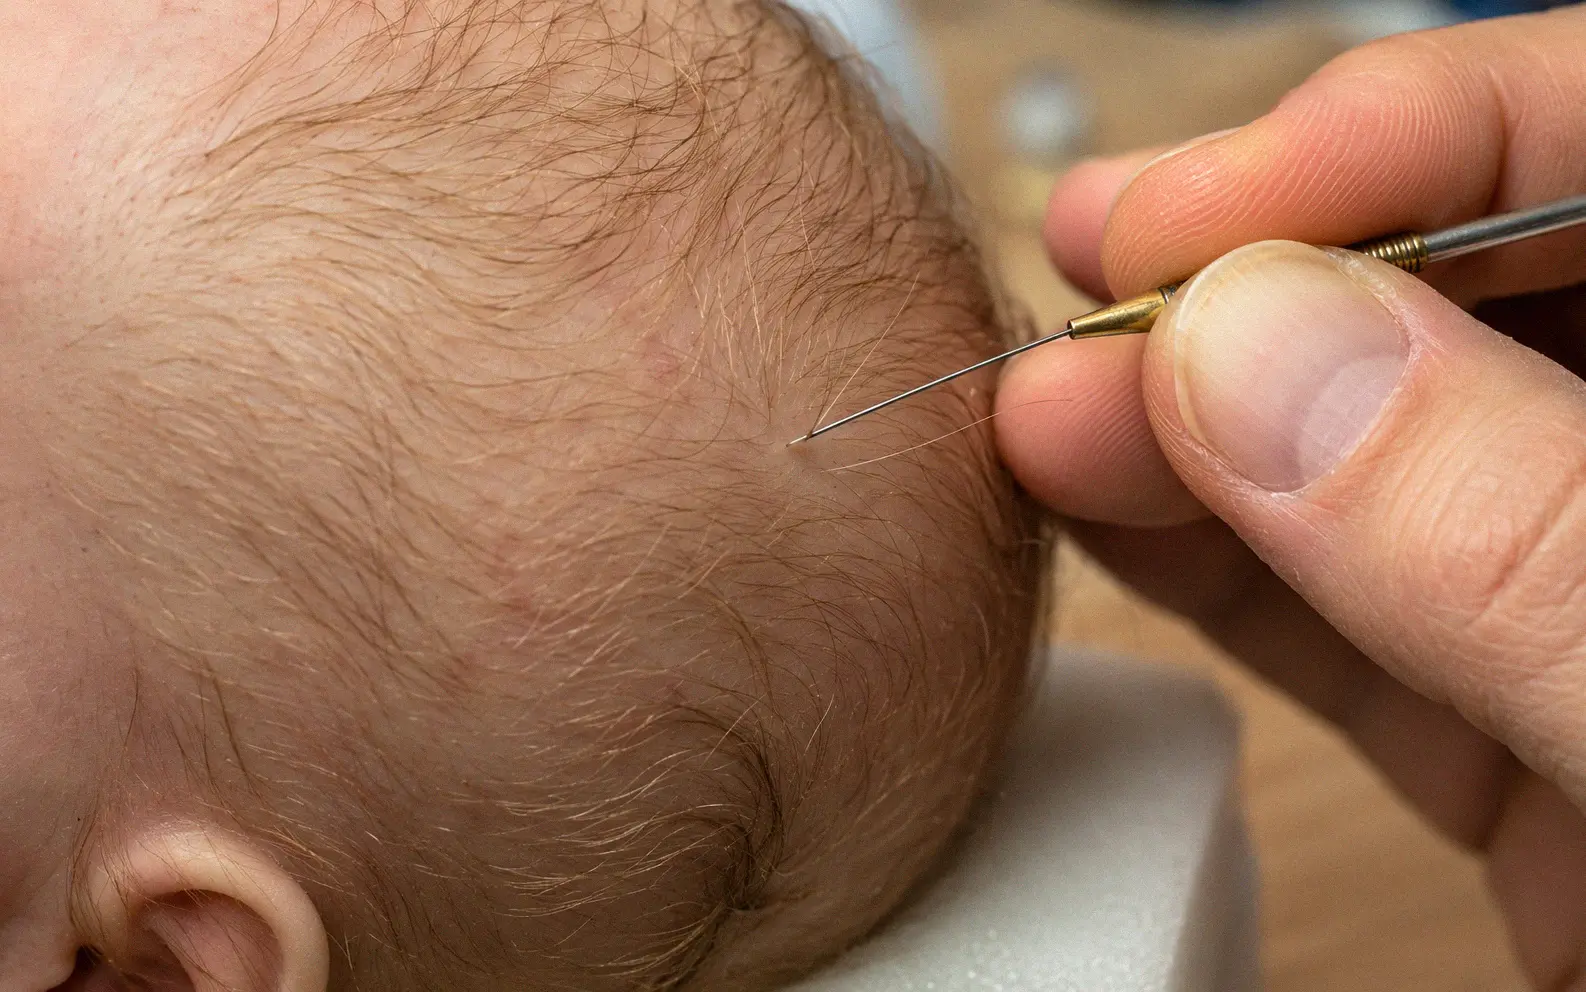
Step 8 – Root Mohair or Human Hair
Rooting hair is what takes a doll from “painted mannequin” to something that genuinely fools people. Most artists go with premium mohair or fine human hair for the softest, most natural look.
Thread a single strand or micro-cluster (two to three hairs) into a 42-gauge rooting needle. Push the needle through the silicone scalp from the outside, twist slightly, and pull back out.
The barbed tip catches and locks the hair inside the silicone, no glue needed.
Work in rows from the nape of the neck upward toward the crown and hairline. Follow the natural growth direction of real infant hair, which typically lies flat and radiates outward from a single whorl point near the crown.
Rooting is the most time-intensive step in the entire project. A full head takes 15 to 30 hours depending on density and technique.
Many artists split this stage across several sessions to prevent hand fatigue and maintain consistent spacing.
After rooting, trim the hair to your desired length and style. A gentle wash with diluted baby shampoo and conditioner removes any silicone dust and softens the hair for styling.
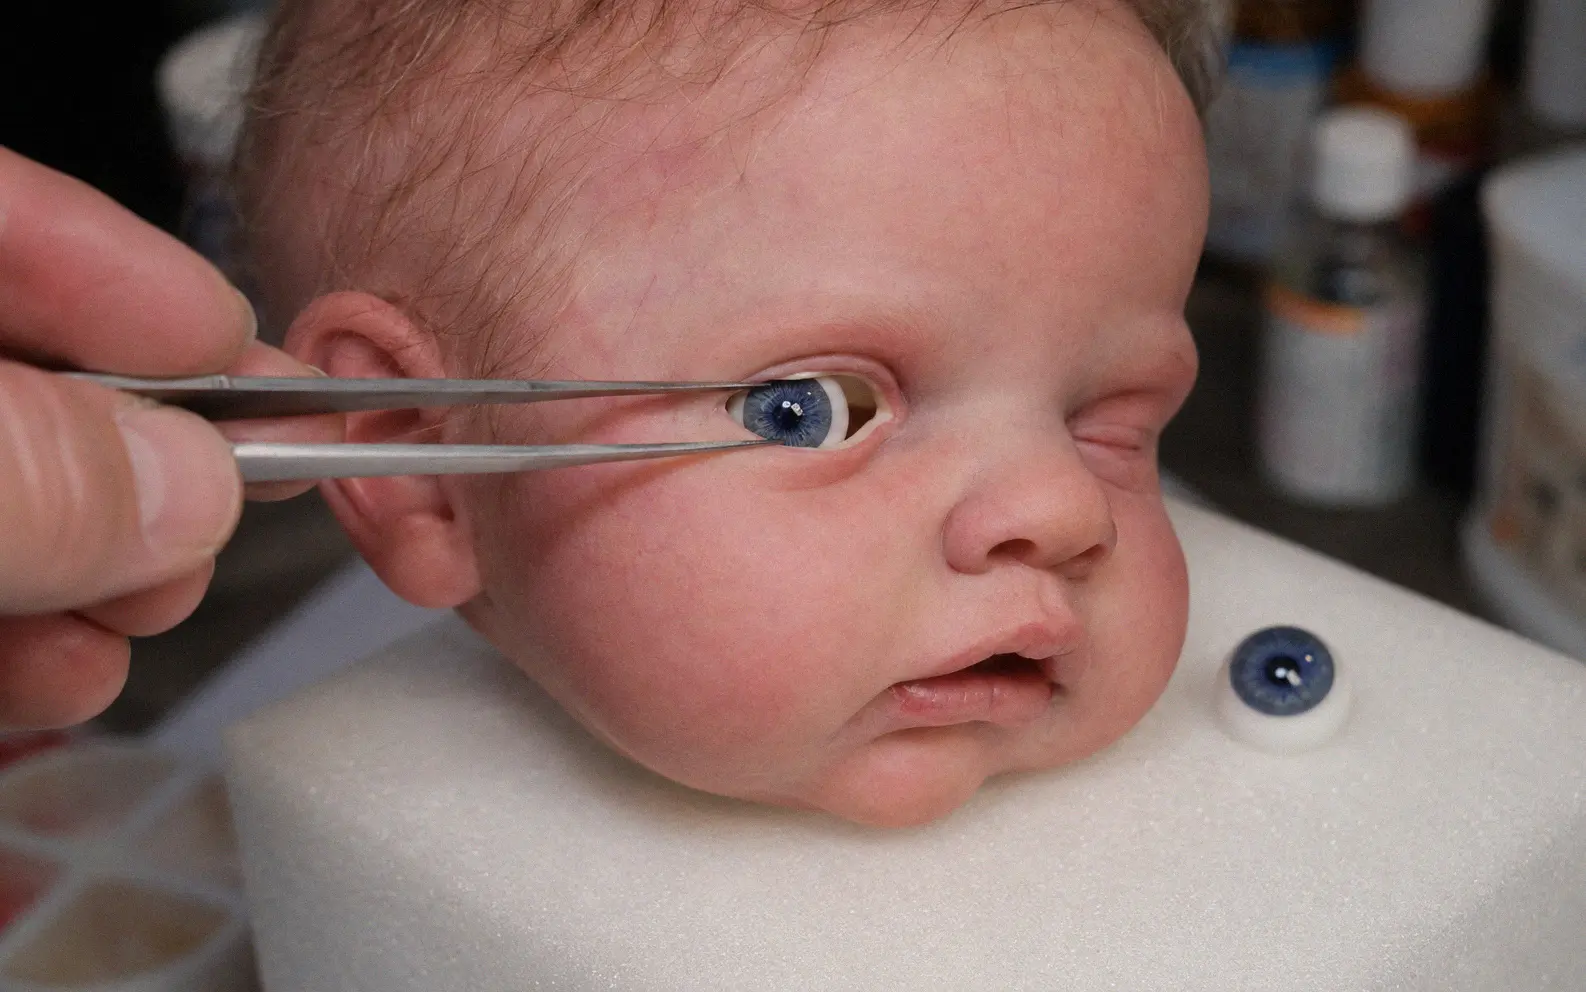
Step 9 – Set the Eyes and Attach Eyelashes
Nothing beats glass eyes with hand-painted irises for a realistic gaze. Acrylic eyes are cheaper, but they don’t have the same depth or light refraction you get with glass.
Cut a small opening in the back of the silicone eye socket if the mold didn’t include one. Apply a thin ring of silicone adhesive (E6000 or platinum-cure glue) around the eye rim and press the glass eye into position for 30 seconds.
Align both eyes by viewing the face straight on from three feet away. Even a one-millimeter offset reads as “wrong” instantly, so tape a chopstick horizontally across the nose bridge as a leveling guide.
Attach eyelashes using the same adhesive, trimming the lash strip to fit the eyelid curve and pressing along the lash line with tweezers. Stick with upper lashes only for newborn reborns.
Step 10 – Weight, Stuff, and Assemble
When someone picks up your finished silicone baby, it should feel like holding a real newborn. Glass micro beads and polyfill stuffing work together to hit that realistic body weight and softness.
Fill the head with a small amount of polyfill for shape support. Pour glass beads into the limbs and torso to reach the target weight.
A full-term newborn weighs six to nine pounds, and most collectors prefer their reborn dolls to match that range closely.

Attach the silicone head and limbs to a cloth body using zip ties or cable ties threaded through the silicone flange and secured inside the fabric. Keep the connection points snug but not tight enough to tear the silicone over time.
Dust the entire exterior surface with cornstarch, matte baby powder, or a specialized product like Silicone Velvet Powder. The powder eliminates the tacky surface texture inherent to platinum-cure silicone and gives the skin a soft, natural matte finish.
Dress the finished doll and place it on a supportive surface for display. Understanding whether silicone melts helps you choose safe display locations away from heat sources that could damage your work.
How Long Does It Take to Make a Silicone Baby?
The total timeline to make a silicone baby depends on your skill level and the complexity of the sculpt. Beginners should expect the process to stretch across three to six weeks when working part-time.
Sculpting takes the longest at 20 to 40 hours for a detailed newborn head and limb set. Mold making requires two to four days of work plus cure time, and casting and demolding take one to two days.
Painting adds another 15 to 25 hours spread across multiple sessions, since each layer needs to dry or heat-set before the next. Hair rooting adds 15 to 30 hours on its own.
Assembly and finishing take a single afternoon once everything is painted and rooted. All told, factoring in cure times and drying windows, most first-time builders wrap up in about 30 to 45 calendar days from start to display.
How Much Does a Homemade Silicone Baby Cost?
Material costs land somewhere between $200 and $500 for a full-body silicone baby, depending on the silicone brand and hair quality you go with. Here’s a rough breakdown for a standard newborn-size doll.
Sulfur-free modeling clay runs $15 to $30 for enough to sculpt a newborn-size original. Mold-making silicone costs $80 to $150 for the volume needed to create a two-part mold of a full head plus limb set.
Casting silicone (Ecoflex or Dragon Skin) costs $40 to $80 per kit, and most projects need one to two kits. Pigments and paint supplies add $30 to $60, while premium mohair runs $20 to $40 for a full head.
Glass eyes, eyelashes, a cloth body, glass beads, polyfill, and basic tools total $50 to $90 combined if you don’t already own them.
The biggest savings over buying a finished doll is labor. A professional reborn artist charges $50 to $100 per hour, so making your own silicone baby saves $2,500 to $10,000 versus commissioning one.
Mistakes That Ruin Silicone Baby Projects
Five errors end most projects: sulfur clay, missing release agent, wrong ratios, rushed cures, and thick paint.
Using sulfur-containing clay kills the silicone cure entirely. Platinum-cure silicone refuses to harden in contact with sulfur, leaving you with a sticky, unusable mold.
Always verify your clay is labeled sulfur-free before starting.
Skipping the release agent fuses the mold halves together, and you lose both the mold and the original sculpture inside it. Apply release agent between every surface that should separate later.
Wrong mix ratios create soft spots or patches that stay tacky forever. Use a digital kitchen scale rather than eyeballing volumes.
Weight-based measuring is far more reliable for thick liquids.
Rushing the cure time produces weak castings that tear during demolding. Let every pour cure for the full time listed on the technical data sheet, even if the surface feels firm earlier.
The interior needs the full window to reach rated strength.
Applying paint too thickly makes the skin look opaque and artificial. Thin, translucent passes layered gradually create depth.
One thick coat can never replicate what six thin coats achieve.
How to make candle molds with silicone covers similar mold prep mistakes if you want more context on avoiding pour failures.
Frequently Asked Questions
Yes, and most beginners start this way. Companies like BB Dolls, Claire Taylor Dolls, and several Etsy shops sell ready-made silicone baby mold kits with head, arms, legs, and torso molds included. Buying a kit skips the sculpting and mold-making stages entirely and lets you jump straight to casting.
Silicone babies are cast from liquid platinum-cure silicone and feel soft, squishy, and realistic to hold. Vinyl reborns use pre-manufactured vinyl kits that artists paint, root, and assemble. Silicone costs more but offers superior realism in weight and skin texture.
A vacuum chamber improves results but is not required. Without one, minimize bubbles by pouring slowly from height, vibrating the mold on a palm sander, and tapping the sides of the mold box after each pour.
Cornstarch, matte baby powder, or a specialty product like Silicone Velvet Powder all work. Any of these removes the tacky feel of freshly cast platinum-cure silicone, leaving a soft, realistic matte finish.
Yes, air-cure silicone paints like Psycho Paint dry at room temperature without heat. An oven is only needed if you choose Genesis Heat Set Paints, which require 265°F between coats.
Keep the doll out of direct sunlight to prevent paint fading and silicone yellowing. Store at room temperature in a breathable garment bag or display case, and reapply cornstarch every few months to maintain the non-tacky finish. Avoid sealed plastic containers since trapped moisture promotes mildew on mohair.
Final Thoughts
At the end of the day, knowing how to make a silicone baby comes down to equal parts craftsmanship and patience. The sculpting and painting stages are where artistic skill shines through, while mold making and casting reward anyone who's precise and careful with their prep.
Start with a pre-made mold kit if this is your first project, and master casting, painting, and rooting before investing time in original sculpting. Each doll you complete teaches techniques that carry into the next build.
What you end up with is a one-of-a-kind piece that holds its value, and represents dozens of hours of focused, hands-on artistry that's genuinely yours.